Skip to content
  • Solutions
  • Resources
  • Events
  • About Us

Create Your Website

Start Building Your Website

Drag & Drop to Build Your Page

Start Selling Online

Selling Product

Reach Your Potential Online Consumers

Booking & Ticketing

Appointment, Rentals and Events

Sales & Marketing Tools

Agent & Affiliate

Boost Your Sales with Agents

Sales Campaign

Direct Customers to the Right Product

Reach Your Audience

Online Email Marketing Tools

Business Overview

Manage Your Store

Business Details and Information

Analytics & Reporting

View Your Online Web Performance

Our Story

Who Are We?

Board Members

Social Media

Facebook

Instagram

Tiktok

Youtube

Github

Reddit

Contact Us

Get in Touch

Support Form

LuluStore

9
  • How to view all orders
  • View Specific Order
  • Overview of an order
  • View, Print, Email and Delete customer invoice
  • To change status of a order
  • Customer History
  • Order Notes
  • Order Actions
  • Import & Export

LuluCreate

8
  • Banner Design: Adding or editing pictures
  • Banner Design: Adding links
  • Banner Design: Text editing
  • Banner Design: Basic Controls
  • Customize your website header
  • Create a page for news or blogs
  • Manage your media inside your website
  • Manage all your website pages

LuluReserve

12
  • Add an appointment
  • Add a Resource
  • Add a Package
  • Add a Category
  • How to add services
  • How to view employees
  • Navigating LuluReserve’s Dashboard
  • Set company-wide days off
  • Set company-wide working hours.
  • How add an employee on LuluReserve
  • How to view your employee on LuluReserve
  • How to view LuluReserve dashboard

LuluPromo

4
  • Create a new Affiliate Group
  • Add a new Affiliate
  • Fine-tune coupon setting by using advanced feature
  • Create a coupon for your customer

LuluBlaster

13
  • Create a recurring email
  • View all your email campaign
  • How to add users into a contact tag – Choose from existing list
  • How to add users into a contact tag – Manually add customer info
  • How to create new tags to be assigned to a contact
  • How to add users into a contact list – Choose from existing list
  • How to add users into a contact list – Manually add customer info
  • Group contacts in a broad spectrum with contact list
  • Add a contact manually
  • How to export your contact list to a CSV file
  • How to import contacts from CSV file
  • How to show all contacts in LuluBlaster
  • LuluBlaster Dashboard

LuluInsight

10
  • Overview
  • Products
  • Categories
  • Variations
  • Orders
  • Coupon
  • Revenue
  • Taxes
  • Stocks
  • Downloads

LuluAdmin

3
  • Business Manager
  • Users
  • Manage your company general information
  • Home
  • Docs
  • LuluReserve
  • Navigating LuluReserve’s Dashboard

Navigating LuluReserve’s Dashboard

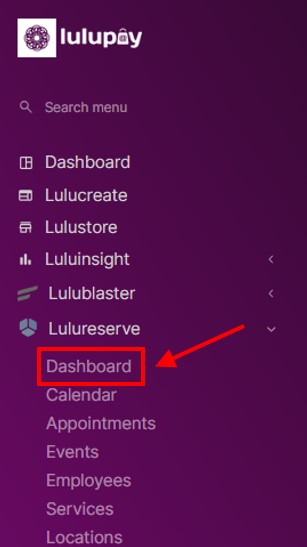
  1. Hover on LuluReserve and click on “Dashboard”.

2. In the first section of the dashboard will contain the dashboard title and the specific time frame.

3. In the second section, will be the introduction header and the amount of approved appointments & pending appointments left.

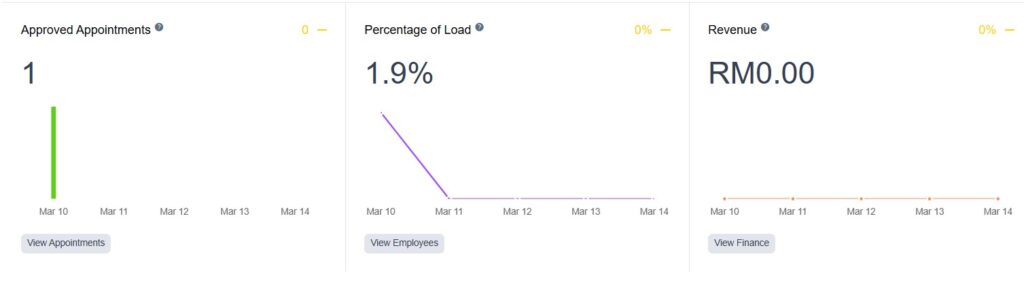
4. In the third section, 3 charts will be shown representing 3 items

  • Approved Appointments:
    Indicates the number of approved appointments
    for a chosen date range.
  • Clicking on the “View Appointment” button will lead to “Appointments” under LuluReserve.
  • Percentage of Load:
    Indicates the percentage of occupied time against available time for appointments
    in the chosen date range.
  • Clicking on “View Employees” will lead to “Employees” under LuluReserve.
  • Revenue:
    Shows the total income for paid appointments
    in the chosen date range.
  • Clicking on “View Finance” will lead to “Finance” under LuluReserve.

(Explanation of each button is need, putting this on hold)

5. The fourth section shows the list of employees, services & packages. To be able to see these specific lists, click on your desired category.

“Employees” Category
“Services” Category
“Packages” Category

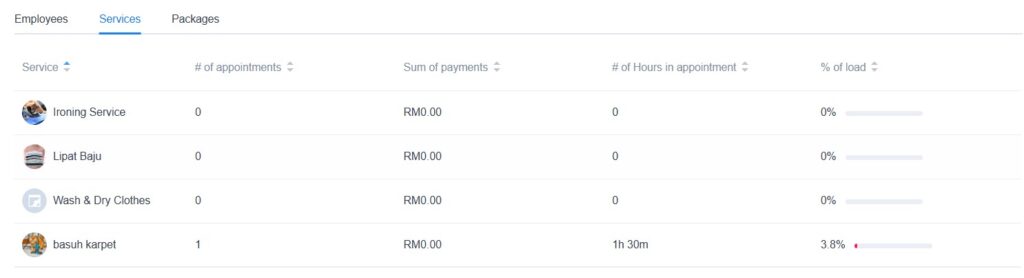
6. In order to see the next page, of each category if the list exceeds the amount that the page is able to show. Click on the number on the bottom right side of the section or any page number that you want.

7. The fifth section shows “Upcoming Appointments”.

  • Upcoming Appointments: Appointments which have yet to be completed.

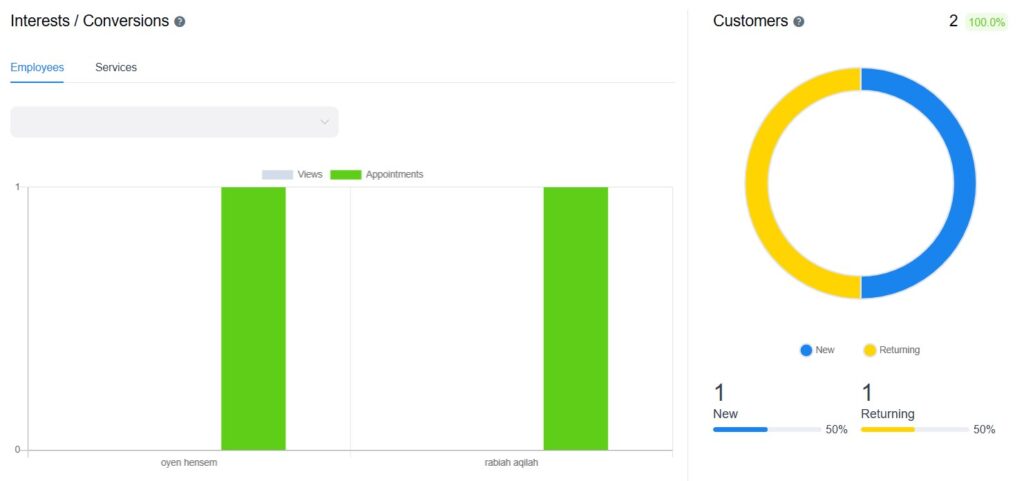
8. The six and last section shows “Interests/Conversions” & “Customers”.

  • Interests/Conversions:
    Shows the number of views for the employee/service/location
    vs. the number of times they were booked during
    the selected date range.
  • To switch between employee, service and location. Do click on the respective tabs.
  • Customers:
    Indicates the number of new and returning customers
    for the selected date range.

What are your Feelings
Share This Article :
  • Facebook
  • Twitter
  • LinkedIn
  • Pinterest
Still stuck? How can we help?

How can we help?

Updated on March 10, 2025
How to view employeesSet company-wide days off

Leave a Reply Cancel reply

Your email address will not be published. Required fields are marked *

Support

Help center

Hire a Professional

Solutions

Online store builder

Website builder

Ecommerce website

Products

E-Commerce

Booking Services

Digital Marketing

Copyright © 2024 All Right Reserved – Lulupay Sdn Bhd
Facebook Instagram Tiktok Youtube
E-mail Call Facebook Chat
For more information visit Helper page.